The Step-by-Step Process of Professional Stucco Installation
You'll want to understand the intricate process behind professional stucco installation, where precision meets craftsmanship. Each step demands careful attention, from substrate evaluation to final finish. The complexity of creating a durable, seamless exterior isn't just about layering materials—it's an art form requiring technical proficiency and strategic application. What secrets lie beneath the surface of a perfectly executed stucco facade?
Surface Preparation and Assessment
Before beginning any stucco installation, thorough surface preparation and assessment are critical to ensuring a successful, long-lasting application. You'll need to start by evaluating existing conditions of the substrate, carefully checking for cracks, moisture damage, or structural irregularities that could compromise the stucco's integrity.
Inspect wall surfaces with great attention to detail, ensuring they're clean, dry, and structurally sound. Remove loose debris, repair minor imperfections, and verify that the underlying structure can support the stucco application. Your exactness during this initial assessment determines the quality and durability of the final finish.
In Chandler, Arizona, professional stucco contractors emphasize that stucco durability depends significantly on proper initial surface preparation and can potentially last up to 60 years when installed correctly.
Installing the Weather Barrier and Lath
Every successful stucco installation depends on properly installing a weather barrier and metal lath, which serves as the critical foundation for the entire exterior finish system. Chandler Stucco Services, a leader in innovative stucco application, ensures that each installation follows meticulous procedures to protect and enhance exterior surfaces. You'll need to carefully apply a weather-resistant barrier over the sheathing, ensuring complete coverage for protecting exterior surfaces from moisture intrusion. Next, you'll attach galvanized metal lath using corrosion-resistant fasteners, securing the lath with precise spacing and alignment. The lath creates a strong, textured surface that allows stucco to cling effectively, providing structural integrity and preventing potential water damage to your building's exterior.
Mixing the Base Coat Correctly
With the weather barrier and lath securely in place, precise base coat mixing becomes the next critical step in achieving a superior stucco finish. You'll want to focus on:
- Measuring materials with exact precision
- Maintaining uniform consistency throughout the mix
- Using clean, quality water at the right temperature
- Controlling mixing duration and technique
Your goal is achieving proper material ratios that guarantee ideal adhesion and durability. Mix the base coat ingredients methodically, paying close attention to manufacturer specifications. Consistently blend cement, sand, and additives until you've created a smooth, lump-free mixture that'll offer a robust foundation for your stucco application.
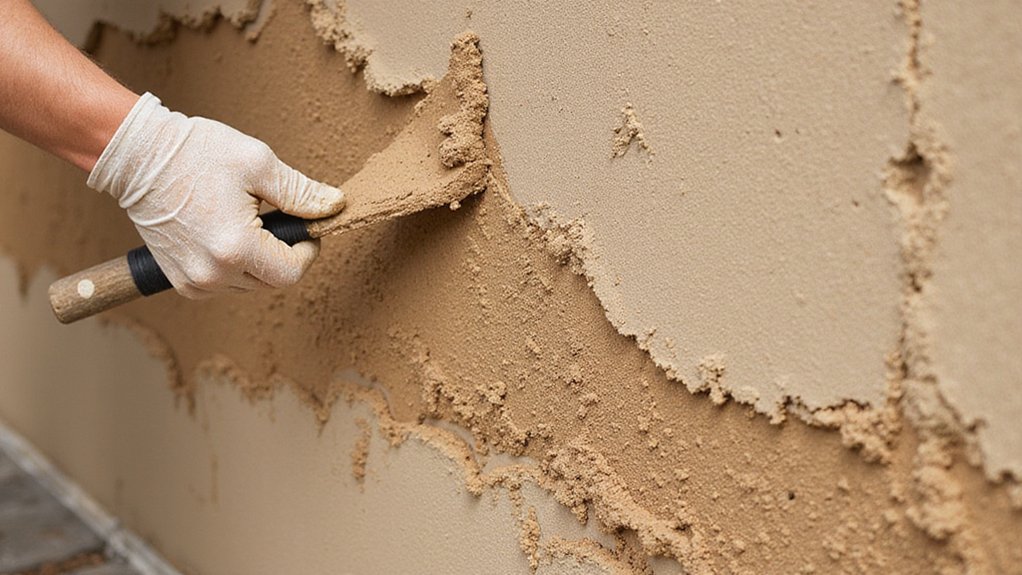
Applying the First Scratch Coat
The first scratch coat represents a fundamental layer in stucco installation, establishing the critical foundation for subsequent coatings. You'll want to apply this layer uniformly across the surface, ensuring proper thickness between 3/8 to 1/2 inch. Use a gauge rake to create horizontal and vertical grooves that'll bolster adhesion for the next coat.
Work methodically, maintaining consistent pressure and angle while spreading the mixture. Pay close attention to proper curing techniques, which involve keeping the surface moist and protected from direct sunlight. Your precision during this stage will directly impact the final stucco appearance and durability.
Creating the Brown Coat Layer
After establishing a solid scratch coat, professional stucco installers move forward to applying the brown coat—a preparatory layer that smooths surface irregularities and provides an ideal substrate for the final finish.
Key brown coat considerations include:
- Carefully testing application techniques to guarantee uniform coverage
- Managing moisture content for optimal adhesion
- Maintaining consistent layer thickness (approximately 3/8 inch)
- Permitting proper curing time before subsequent layers
You'll want to use a metal straightedge to level and create a smooth, even surface that'll support your final stucco finish. Precision during this stage determines the overall quality of your stucco installation.
Selecting and Applying the Finish Coat
Since the brown coat provides a smooth foundation, selecting and applying the finish coat demands meticulous attention to detail and material compatibility. You'll want to carefully choose from traditional acrylic, traditional cement, or synthetic stucco finishes based on your project's specific environmental conditions and aesthetic requirements.
When evaluating finish coat durability, consider factors like climate exposure, color retention, and long-term performance. Precise application techniques—using specialized trowels and maintaining consistent pressure—will guarantee a uniform, professional-grade surface that withstands weathering and bolsters your structure's architectural integrity.
Addressing Color and Texture Techniques
Building upon the foundational smoothness of the brown coat, color and texture techniques represent the visual and tactile pinnacle of professional stucco installation. You'll want to master these critical finishing elements to heighten your project's aesthetic appeal:
- Color matching guarantees seamless integration with existing architectural elements
- Texture customization permits for unique surface treatments
- Pigment selection influences long-term durability and visual harmony
- Application techniques determine final visual complexity
Your precision in blending specialized aggregates, selecting integral or topcoat pigments, and controlling trowel pressure will define the stucco's ultimate character. Professional results demand meticulous attention to these nuanced techniques.
Final Inspection and Quality Control
The critical eye of a professional examines every inch of the stucco surface, ensuring that quality isn't just a promise but a delivered reality. You'll walk through final inspection procedures, systematically checking texture uniformity, color consistency, and surface integrity.
Quality control checkpoints demand painstaking attention: verify no cracks, assess edge shifts, confirm proper adhesion, and inspect for potential moisture vulnerabilities. Your trained assessment identifies subtle imperfections that could compromise long-term performance. Each measurement, each observation contributes to a flawless finish that meets rigorous industry standards, altering your stucco installation from good to exceptional.
Frequently Asked Questions
How Long Does a Professional Stucco Installation Typically Take?
You'll need 4-7 days for a complete stucco installation, depending on your project's complexity, drying time requirements, and precise application techniques. Weather conditions and wall size greatly impact the overall timeline.
What Is the Average Lifespan of a Professionally Installed Stucco Exterior?
You'll find professionally installed stucco can last 50-80 years with proper durability considerations and consistent maintenance requirements, ensuring a resilient exterior that reflects your commitment to quality craftsmanship.
Can Stucco Be Applied to Any Type of Existing Home Structure?
You'll need to evaluate your home's structural integrity, material compatibility, and local building code requirements. Cost considerations and professional assessment determine whether stucco can be successfully applied to your specific structure.
How Much Does Professional Stucco Installation Cost per Square Foot?
You'll find stucco installation costs range from $6 to $9 per square foot, depending on material quality and specific cost factors like substrate preparation, labor complexity, and regional pricing variations.
Is Stucco a Good Option for Regions With Extreme Weather Conditions?
You'll want stucco in extreme climates if it's properly engineered with superior moisture control and thermal insulation, ensuring your home's durability against harsh temperature fluctuations and environmental challenges.